Classic Fantasy · point-crawl
Classic Fantasy point crawl example: The Receding Tide Road
An interconnected 8-location coastal fantasy point crawl across tidal causeways, sea-caves, and ruined cliff-abbeys exposed only during the king-tide, featuring branching routes, hidden crawlspaces, and a clue-gated final ascent.
Generated output
 Expand image ↗
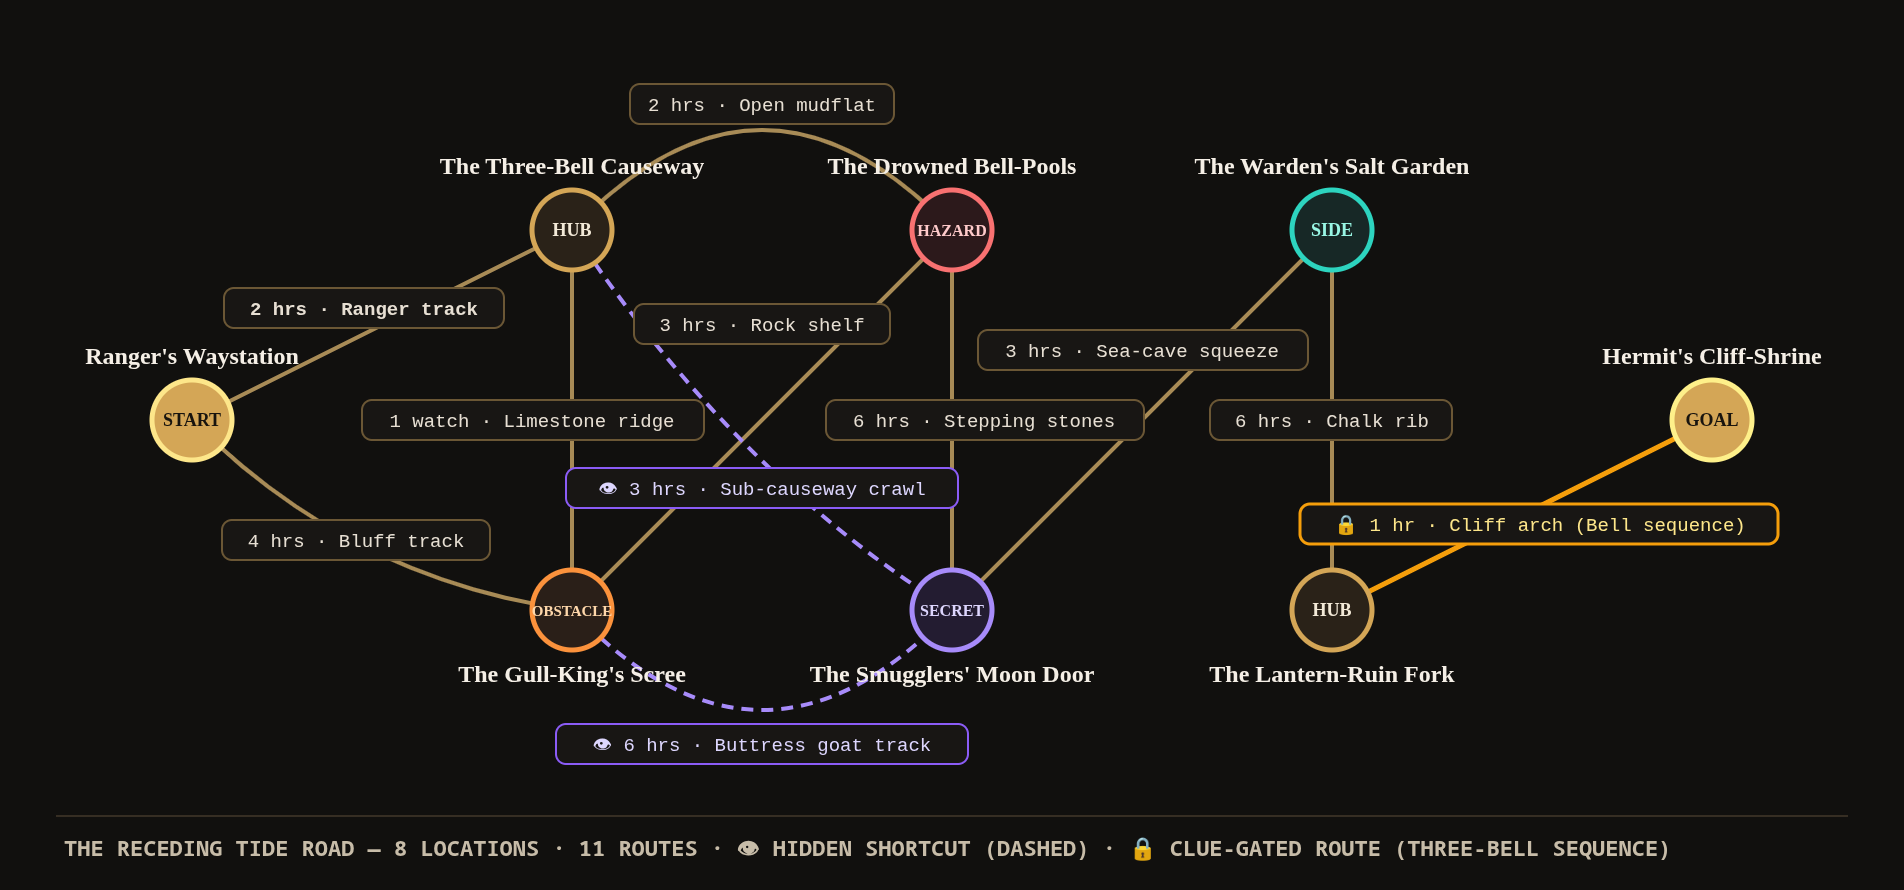
The Receding Tide Road route topology: 8 locations across four coastal layers with two hidden bypasses and one clue-gated final ascent.
Crawl Premise & Operational Rules
- Scale & Movement
- Wilderness point crawl; movement is tracked in hours and watches (1 watch = 4 hours).
- Starting Point
- Location 1: Ranger's Waystation (sheltered cliff-head turf hut).
- Primary Goal
- Location 8: Hermit's Cliff-Shrine (unflooded reliquary sanctuary overlooking the reefs).
- The King-Tide Clock
- The autumn king-tide recedes for an 18-hour window before the sea surges back. Low-elevation mudflats and bell-pools submerge first; higher cliff routes remain dry.
- Key-Before-Lock Mechanic
- The Three-Bell Toll Sequence (Low, High, Low) carved at Location 2 (Causeway) unlocks the sheltered cliff arch at Location 7, granting access to the shrine.
The Receding Tide Road: Situation & Atmosphere
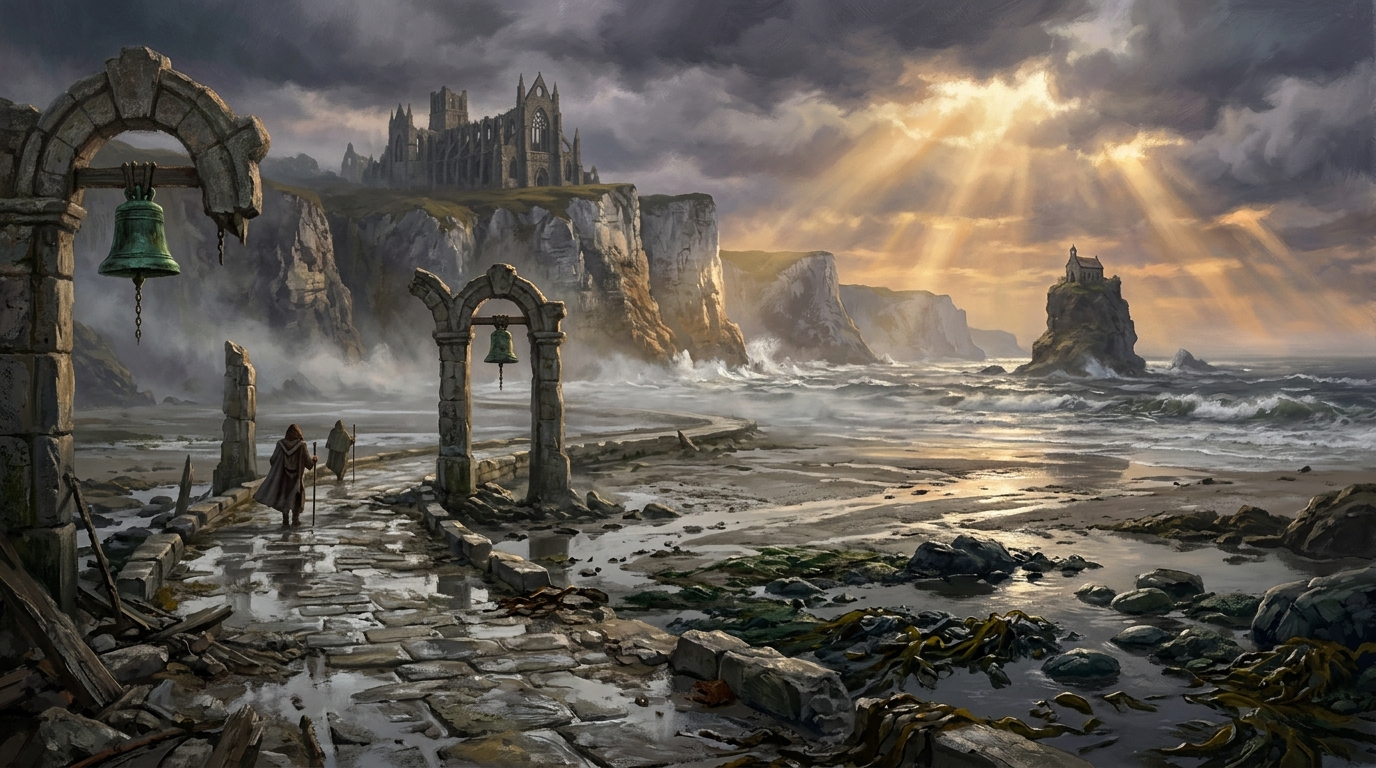
Twice a year during the autumn equinox, the king-tide pulls back three miles from the jagged cliffs of the Salt Coast, exposing the drowned pilgrimage road of Saint Vael. For eighteen hours, ancient limestone causeways, barnacle-encrusted bell-arches, and kelp-draped cave mouths rise out of the grey surf before the sea rushes back to swallow them once more.
Rival salvage crews from the coastal shanties, monastic relic-wardens, and drowned guardians wander this exposed expanse. The party begins at the Ranger's Waystation atop the high bluffs, looking down across the mist-shrouded mudflats toward the Hermit's Cliff-Shrine perched high on the outer sea-stacks. To reach the shrine and recover the saint's silver reliquary before high water, the party must navigate branching causeways, avoid rising tidal pools, and unearth the lost chime sequence that opens the final cliff arch.
Keyed Locations (8 Points)
- 1. Ranger's Waystation (Start Point)
Sights & Atmosphere: A turf-roofed stone hut built into a grassy cliff hollow, filled with salt-crusted oil lanterns, drying sealskins, and a copper weather-vane creaking in the onshore gale.
Why Visit: The only sheltered inland outpost above the high-water mark; a safe place to rest and gather local advice.
Encounter: Gareth Vance, a weathered coastal ranger mending drift-nets, warns that the lower mudflats suck boots off feet and that the tide roars back faster than a running dog.
Clue / Reward: A grease-pencil tide chart pinned to the hearth timber showing the 18-hour low-water deadline.
Signposts: A well-worn dirt track descends westward toward the stone ribs of the causeway; a second rough bluff track heads south along the grassy cliff tops toward the shrieking seabird colonies.
- 2. The Three-Bell Causeway (Junction Hub)
Sights & Atmosphere: A raised limestone causeway running two hundred paces across the mudflats, punctuated by three green-bronze bells suspended within ruined arches of salt-bleached granite. Sea-spray drifts across the slick pavers.
Why Visit: The central crossing of the upper flats, offering paths toward the scree, the drowned pools, and a concealed smugglers' passage.
Encounter: Two rival scavengers from the 'Drowned Dog' salvage crew, prying verdigris-coated bell fittings with crowbars, watchful and quick to draw rusted cutlasses if cornered.
Clue / Reward: Carved into the pedestal of the center bell is the monastic chime instruction: 'To pass the lantern arch when the fog rolls in, strike Low, High, Low.'
Signposts: The stone causeway continues north toward the scree; a line of wooden channel stakes points east across the flats toward the bell-pools; faint bootprints lead to a low seam beneath the causeway arches.
- 3. The Gull-King's Scree (Junction Hub / Obstacle)
Sights & Atmosphere: A steep fan of broken shale and chalk boulders tumbling from the cliff face down to the shore, white with centuries of guano and populated by thousands of aggressive black-backed gulls.
Why Visit: High, dry ground that stays above the early tidal surge; offers a vantage over the entire coastline.
Encounter: A territorial flock of great gulls dive-bombing intruders, led by an enormous scarred specimen ('The Gull-King') that attempts to snatch shiny gear and food sacks.
Clue / Reward: Halfway up the scree, inside a hollowed drift-log cache, lies a waterlogged smuggler's satchel containing a brass spyglass and a vial of waterproof lantern oil.
Signposts: A rough scree trail climbs north toward the causeway; a direct bluff path leads east toward the Ranger's Waystation; a narrow shelf descends south-east toward the bell-pools; faint goat droppings mark a hidden contour behind the outer buttress.
- 4. The Drowned Bell-Pools (Junction Hub / Hazard)
Sights & Atmosphere: A series of wide, brackish tidal sinkholes filled with pale anemones and submerged monastic foundations. Tattered kelp fronds sway in water that appears bottomless.
Why Visit: The most direct eastern route toward the inner caves, but vulnerable to rising water.
Encounter: Three Drowned Penitents—waterlogged corpses wrapped in sodden woollen habits and heavy stone rosaries—shambling through the waist-deep pools toward the sound of movement.
Clue / Reward: Resting in a stone niche beneath three feet of clear brine is a pewter pilgrim's ampulla filled with consecrated holy water (damages undead).
Signposts: Submerged stone slabs lead north toward the causeway; mudflat markers lead west toward the scree; a line of half-submerged stepping stones leads south toward the cliff cleft.
- 5. The Smugglers' Moon Door (Chokepoint / Secret Hub)
Sights & Atmosphere: A natural fissure in the sea-cliff wall, sheltered behind a curtain of hanging bladderwrack. Inside, the cavern floor is dry white sand littered with cask hoops, broken wax seals, and extinguished torches.
Why Visit: A concealed junction that bypasses the exposed open beaches and connects directly to the upper salt gardens.
Encounter: Old Meg, an exiled smuggler living in a driftwood shelter inside the fissure, nursing a scalded arm and willing to trade advice or dry kindling for fresh water or spirits.
Clue / Reward: Meg warns that the Lantern-Ruin arch ahead is sealed by ancient mechanism and requires the chime sequence carved back on the causeway bells.
Signposts: Stepping stones lead north toward the bell-pools; a tight limestone chimney ascends inland toward the causeway; a narrow cave passage leads south-east into the salt garden.
- 6. The Warden's Salt Garden (Chokepoint / Side Point)
Sights & Atmosphere: Terraced stone evaporation basins carved directly into the seaward cliff terraces. Crusts of brilliant white salt glitter in the weak sun, and ancient carved stone saints stand sentinel along the retaining walls.
Why Visit: High ground overlooking the outer bay, offering a chance to survey the final approach to the shrine.
Encounter: A lone Relic-Warden named Brother Kaelen, praying among the salt pans with a heavy ash quarterstaff, suspicious of plunderers but willing to aid genuine pilgrims.
Clue / Reward: Brother Kaelen offers a pouch of restorative medicinal salt (restores stamina and cures saltwater rot) if the party vows not to desecrate the saint's bones.
Signposts: A sea-cave crawl leads north-west back toward the Moon Door; a cracked chalk rib climbs south toward the lantern ruins.
- 7. The Lantern-Ruin Fork (Chokepoint / Gated Hub)
Sights & Atmosphere: The rubble apron of a collapsed monastic lighthouse perched on an exposed headland. A massive stone archway frames the final cliff path, hung with three heavy iron chimes and sealed by a drop-grate of rusted portcullis bars.
Why Visit: The sole secure gateway leading to the Hermit's Cliff-Shrine.
Encounter: A howling crosswind that threatens to strip cloaks and extinguish open flames; salt-spray coats the rocks in slick slime.
Clue / Reward: Striking the three portcullis chimes in the sequence learned at Location 2 ('Low, High, Low') causes counterweights within the stone pillars to groan and lift the portcullis smoothly.
Signposts: A steep chalk trail leads north back toward the salt garden; beyond the iron portcullis, a narrow arched cliff path climbs east to the solitary shrine; below the ruins, a sheer drop falls to churning surf.
- 8. Hermit's Cliff-Shrine (Destination / Goal)
Sights & Atmosphere: A solitary chapel carved from the heart of an offshore sea-stack, connected to the mainland only by the arched cliff path. Inside, beeswax candles still burn in alcoves sheltered from the wind, and a silver reliquary casket rests upon an altar of sea-worn basalt.
Why Visit: The objective of the expedition; contains the sacred relics of Saint Vael and ancient monastery logs.
Encounter: The Ghost of the Hermit, a sorrowful apparition kneeling at the altar, demanding to know whether the travellers bring respect or greed before stepping aside.
Clue / Reward: The Silver Reliquary of Saint Vael (contains the saint's incorrupt hand and a ring of sea-warding that grants water-breathing for one hour).
Signposts: The arched path leads west back to the Lantern-Ruin Fork; beneath the altar, an emergency sea-skiff is lashed to bronze rings above the high-tide mooring.
Route Network & Travel Choices (11 Routes)
- 1. Waystation ↔ Causeway (2 hrs)
Terrain: Packed ranger track · Signposts: Follows turf markers down the bluff to raised stone causeway ribs · Risk: Exposed to chilly sea-spray; clear footing.
- 2. Causeway ↔ Scree (1 watch / 4 hrs)
Terrain: Limestone ridge · Signposts: Rough limestone trail climbing from causeway to broken shale slope · Risk: Loose rock underfoot; risk of minor sprains.
- 3. Scree ↔ Bell-Pools (3 hrs)
Terrain: Rock shelf · Signposts: Narrow shelf skirting foot of scree between rust-red rock shelves · Risk: Slick kelp and pool margins; requires steady pace.
- 4. Bell-Pools ↔ Moon Door (6 hrs)
Terrain: Stepping stones · Signposts: Half-submerged stepping stones across pools to low cliff cleft · Risk / Hazard: Rising tide deepens pools first; Drowned Penitents patrol.
- 5. Moon Door ↔ Salt Garden (3 hrs)
Terrain: Sea-cave squeeze · Signposts: Narrow sea-cave passage over ribbed rock with waist-high crawl · Risk: Claustrophobic squeeze; damp and torchlight-dependent.
- 6. Salt Garden ↔ Lantern-Ruin (6 hrs)
Terrain: Chalk rib · Signposts: Exposed traverse across uneven shingle, then steep zigzag up chalk rib · Risk: High crosswinds; precipitous drops to seaward rocks.
- 7. Lantern-Ruin ↔ Shrine (1 hr)
Terrain: Cliff arch · Signposts: Narrow cliff path beneath leaning stone arch onto shrine stack · Locked Gate: Requires Three-Bell Sequence (Low, High, Low) learned at Location 2.
- 8. Waystation ↔ Scree (4 hrs)
Terrain: Bluff track · Signposts: Direct upland track along grassy shoulder, avoiding mudflats entirely · Strategic Trade-Off: Stays completely dry; bypasses lower causeway and bells.
- 9. Causeway ↔ Bell-Pools (2 hrs)
Terrain: Open mudflat · Signposts: Fast crossing over hard-packed mud between isolated tidal pools · Risk: Mud sucks at boots; submerged if tide returns early.
- 10. Causeway ↔ Moon Door (3 hrs — Hidden Shortcut)
Terrain: Sub-causeway crawl · Signposts: Hidden seam beneath causeway arches through dry limestone crawlspace · Concealment: DC 13 Investigation/Perception to discover beneath arches.
- 11. Scree ↔ Moon Door (6 hrs — Hidden Shortcut)
Terrain: Buttress goat track · Signposts: Concealed goat track traversing upper scree behind sea-facing buttress · Concealment: DC 14 Survival or spotting sea-bird ledges to locate.
GM Reference: Locks, Gates & Hidden Shortcuts
- The Three-Bell Toll Sequence (Key-Before-Lock)
Location 7 (Lantern-Ruin Fork) is barred by a rusted drop-grate portcullis hung with three bronze chimes. Striking them in the order 'Low, High, Low' raises the gate. This sequence is carved into the pedestal of the center bell at Location 2 (The Three-Bell Causeway). Parties who bypassed the causeway via the upland bluff track (Route 8) will find the gate shut and must either backtrack or attempt a perilous DC 16 Strength (Athletics) climb around the wave-washed outer cliff face.
- Hidden Shortcut A: Sub-Causeway Crawlspace (Route 10)
Beneath the raised stone arches of Location 2, an ancient inspection seam leads through a dry limestone tunnel directly into Location 5 (The Smugglers' Moon Door). Finding it requires searching beneath the arches (DC 13 Intelligence (Investigation) or a smuggler tide chart). Travel time is only 3 hours, completely bypassing the perilous 6-hour stepping-stone crossing and the Drowned Penitents at Location 4.
- Hidden Shortcut B: Buttress Goat Track (Route 11)
Behind the guano-covered buttresses of Location 3 (The Gull-King's Scree), feral goats have worn a narrow trail that contours around the cliff face to drop directly into the Moon Door cavern. A successful DC 14 Wisdom (Survival) check identifies the tracks. While it takes 6 hours to traverse, it allows parties coming from the upland bluff track to bypass the lower flats entirely.
- Environmental Hazard: The King-Tide Clock
The party has an 18-hour window from the moment they leave the Waystation.
At hour 12: The lower mudflats and Bell-Pools (Locations 2 & 4, Routes 4 & 9) begin filling with swirling surf (+2 hours travel time or DC 12 Strength (Athletics) to wade).
At hour 16: Routes 4 and 9 are completely submerged and impassable without water-breathing.
If the party tarries, their only retreat is via the upper cliff paths (Routes 6, 8, and 11).
Example of Play: Choosing an Approach Before the Tide Turns
The party stands at Location 1 (Ranger's Waystation) at dawn. The coastal ranger Gareth warns them that the king-tide gives them eighteen hours before the mudflats flood. They face an immediate choice between two paths to begin their journey:
Approach A (The Lower Causeway): The party takes Route 1 (2 hours, packed ranger track) down to Location 2 (The Three-Bell Causeway). They spend half an hour negotiating with two tense 'Drowned Dog' scavengers. While there, the wizard inspects the bronze bell pedestal and copies down the carved monastic inscription: 'Strike Low, High, Low'. The rogue searches beneath the arches and succeeds on a DC 13 Investigation check, discovering Hidden Route 10 (Sub-causeway crawlspace, 3 hours). By slipping through the crawlspace, they reach Location 5 (The Smugglers' Moon Door) in just 5 total hours of travel, completely avoiding the Drowned Penitents at the Bell-Pools. From the Moon Door, they climb through the Salt Garden (3 hours) to Location 7 (The Lantern-Ruin Fork) at hour 14.5, including the negotiation. Because they possess the Three-Bell sequence, they ring the chimes and take the one-hour sheltered cliff path to the shrine, arriving at hour 15.5 with two and a half hours to spare.
Approach B (The Upland Bluff Track): Seeking to keep their boots dry and avoid the low fog, the party takes Route 8 (4 hours, bluff track) straight to Location 3 (The Gull-King's Scree). They fend off the territorial gulls, uncover the smuggler's oil cache, and spot the goat track (Route 11, 6 hours) contouring around the buttress. They arrive at Location 5 (Moon Door) at hour 10, then proceed up through the Salt Garden (3 hours) and the chalk rib (6 hours), arriving at Location 7 (Lantern-Ruin Fork) at hour 19—just as the king-tide begins roaring into the bays below. Worse, when they reach the barred iron portcullis, they have no idea what chime sequence to ring. Forced to either attempt a desperate DC 16 Athletics climb in the dark over wet sea-stacks or turn back while the lower roads are drowning, the party experiences the tangible consequence of skipping the causeway hub.
Editorial Commentary & Table Usage
Why this point-crawl structure works at the table
In tabletop exploration, a wilderness point crawl must balance meaningful player agency against the risk of aimless wandering. The Receding Tide Road succeeds because its 8 locations are bound together by clear directional signposts and explicit time costs. Players are never told 'roll Survival to find the path'; instead, every location gives them visible physical choices: a packed stone track versus a high grassy bluff, an open mudflat versus an echoing sea-cave.
The key-before-lock placement demonstrates proper non-linear design. The clue that unlocks the final gateway at Location 7 is located at Location 2—an early, exposed hub that players might be tempted to bypass in favour of the safer upland track. Placing the solution on an alternate route rewards players who investigate the world rather than rushing straight for the destination, without forcing a single railroaded path.
Finally, the two hidden bypasses (the sub-causeway crawlspace and the buttress goat track) provide tactical relief. If a party spends heavy resources dealing with the gulls or scavengers, finding a hidden route lets them skip the hazardous stepping stones and Drowned Penitents at Location 4, preserving their spells and hit points for the shrine itself.
Roll your own with the point crawl generatorRelated
Generators
- Point Crawl Generator Build 6–15 node exploration networks with branching routes, loops, and key-before-lock gates.
- Dungeon & Delve Generator Generate multi-level dungeon sites, ruin architecture, and boss chambers.
- Settlement Generator Create coastal fishing villages, smuggling havens, and cliff communities.
Answers
- How do you build a point crawl for an RPG? The five-step design procedure for connecting nodes, signposting choices, and placing keys.
- Point crawl vs hex crawl When to use discrete travel routes rather than uniform terrain hexagons.
- What is a point crawl in tabletop RPGs? The core concepts: nodes, edges, movement costs, and navigation procedures.